11/18/2016

WooCommerce API Using RestSharp Over HTTP With OAuth

Now after searching NuGet I saw that there is a C# WooCommerce library out there all ready written called WooCommerce.NET. This isn’t going to work for me because I will need the ability to gain access to custom Order fields.

So I decided to just use my favorite REST client RestSharp to contact a fairly simple REST API for WooCommerce. But I was running into a strange authentication issue and being denied authentication with a 401 status code.

Now, first a disclaimer… DO NOT USE HTTP FOR WooCommerce IN A PRODUCTION ENVIRONMENT!

Ok, but I need to do some testing in a local environmnet so I can see that my code is working properly. Reading the WooCommerce documentation for authentication, which can be found here, it clearly states:

The OAuth parameters must be added as query string parameters and not included in the Authorization header. This is because there is no reliable cross-platform way to get the raw request headers in WordPress.

So I do a bit of digging about RestSharp and OAuth1.0 and come up with this suite of tests. Here’s the important bit that I needed:

1
2
3
4
5
6
7
8
9
10
11
12
13
14
15
16
17
18
19
20
21
22
23
24
25
26
27
[Test]
public void Can_Authenticate_OAuth1_With_Querystring_Parameters()
{
const string consumerKey = "enterConsumerKeyHere";
const string consumerSecret = "enterConsumerSecretHere";
const string baseUrl = "http://restsharp.org";
var expected = new List<string>
{
"oauth_consumer_key",
"oauth_nonce",
"oauth_signature_method",
"oauth_timestamp",
"oauth_version",
"oauth_signature"
};

RestClient client = new RestClient(baseUrl);
RestRequest request = new RestRequest(Method.GET);
var authenticator = OAuth1Authenticator.ForRequestToken(consumerKey, consumerSecret);
authenticator.ParameterHandling = OAuthParameterHandling.UrlOrPostParameters;
authenticator.Authenticate(client, request);

var requestUri = client.BuildUri(request);
var actual = HttpUtility.ParseQueryString(requestUri.Query).AllKeys.ToList();

Assert.IsTrue(actual.SequenceEqual(expected));
}

The above Authenticate method will do all the work and add all the parameters I need.

But wait… Something’s not right here. In the debugger it shows me that the parameters on the request are being added as cookes:

Visual Studio Debugger

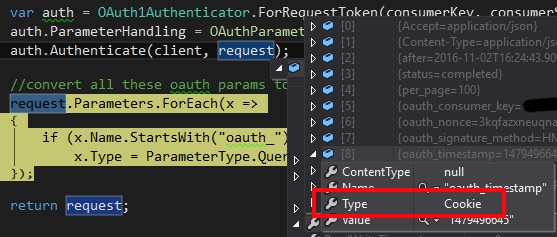
Strange, but ok. So I decided to make an extension method that does all the authentication, gets all the parameters added to the request, and then converts them to QueryString parameters.

1
2
3
4
5
6
7
8
9
10
11
12
13
14
15
16
17
18
public static class RestRequestExtensions
{
public static RestRequest BuildOAuth1QueryString(this RestRequest request, RestClient client, string consumerKey, string consumerSecret)
{
var auth = OAuth1Authenticator.ForRequestToken(consumerKey, consumerSecret);
auth.ParameterHandling = OAuthParameterHandling.UrlOrPostParameters;
auth.Authenticate(client, request);

//convert all these oauth params from cookie to querystring
request.Parameters.ForEach(x =>
{
if (x.Name.StartsWith("oauth_"))
x.Type = ParameterType.QueryString;
});

return request;
}
}

So the code to build a request now looks something like this.

1
2
3
4
var client = new RestClient("http://example.com/api/v1");
var request = new RestRequest("/path/to/resource");
request.BuildOAuth1QueryString(client, "{consumer_key}", "{consumer_secret}");
var response = client.Execute(request);

And there we have it. Talking to WooCommerce with RestSharp.

For Production

I can not stress enough to not communicate over HTTP in production. In production, you should be using HTTPS. In that case you can use HTTP Basic Authentication. Then you will no longer need the BuildOAuth1QueryString extension method, you would simply add the Basic Authentication to the client like so:

1
2
//Basic over Https
client.Authenticator = new HttpBasicAuthenticator("{consumer_key}", "{consumer_secret}");

Hope this helps!

View Comments
04/27/2009

The HttpWebRequest and Using Client Certificates

So you may have found yourself in a similar situation, needing to make a TCP/IP request to a 3rd party API possibly using SSL. Well, that is a quite simple task. It can however, be complicated if this 3rd party requires the use of certificates for communication to its API server. I found myself in some sort of certificate hell where I had the certificate, added it to the request and somehow it still wasn’t working. If you know what I’m talking about and had as many hurdles as I did, my condolences to you. I will try to explain in this article how I started, the problems I ran into and then the overall solution that ended up working for me.

To start with, you should have some kind of certificate. Most likely a *.pfx or *.p12 file. This can also come with a private key or password for the certificate’s encryption. This is what a standard WebRequest over SSL might look like:

1
2
3
4
5
6
7
8
9
10
11
12
13
14
15
16
17
18
19
20
21
22
23
24
25
26
public string GetData(string inputData)
{
//will hold the result
string result = string.Empty;
//build the request object
HttpWebRequest request = (HttpWebRequest)WebRequest.Create("https://someapi.com/");
//write the input data (aka post) to a byte array
byte[] requestBytes = new ASCIIEncoding().GetBytes(inputData);
//get the request stream to write the post to
Stream requestStream = request.GetRequestStream();
//write the post to the request stream
requestStream.Write(requestBytes, 0, requestBytes.Length);
//build a response object to hold the response
//submit the request by calling get response
HttpWebResponse response = (HttpWebResponse)request.GetResponse();
//get the response stream to read the response from
Stream responseStream = response.GetResponseStream();
//now read it out to our result
using (StreamReader rdr = new StreamReader(responseStream))
{
//set the result to the contents of the stream
result = rdr.ReadToEnd();
}
//return
return result;
}

The example above is missing the portion where you add the certificate to the request. You may receive a 403 Forbidden error from the server if a certificate is required to make the request to the API server. A simple way of adding a certificate to the request would be like so:

1
2
//add certificate to the request
request.ClientCertificates.Add(new X509Certificate(@"C:\certs\Some Cert.p12", @"SecretP@$$w0rd"));

The X509Certificate class is found in the System.Security.Cryptography.X509Certificates namespace. Simply add a new certificate to the client certificates before calling for the response, and it should be sent with the request. However, you may encounter an exception with the message “The system cannot find the file specified”. I encountered this error after I got the application off my local machine and onto the development server. After doing some research I stumbled upon this kb article. This article opened my eyes to how using certificates is a little more complicated than I initially thought. Turns out the problem was that the user trying to access the certificate does not have a profile loaded.

After stepping through the article, installing the certificate to the local machine’s personal certificate store, and then granting rights to the certificate using the WinHttpCertCfg.exe tool, and putting in a little more code found in the kb article, I was well on my way. The article describes how to use C# to open a certificate store and use the certificate directly out of the store. This presents a bit more elegant, and in my opinion more secure, way of getting to and using the certificate.

1
2
3
4
5
6
//add it in a better way
X509Store certStore = new X509Store("My", StoreLocation.LocalMachine);
certStore.Open(OpenFlags.ReadOnly | OpenFlags.OpenExistingOnly);
X509Certificate2 cert = certStore.Certificates.Find(X509FindType.FindBySubjectName, "My cert subject", false)[0];
certStore.Close();
request.ClientCertificates.Add(cert);

This method will not only give access to the certificate regardless of having a loaded profile, but it also takes the certificate’s private key password out of the code and/or configuration. This snippet above took me out of the certificate hell that was crushing my life for a couple days!

Putting it all together:

1
2
3
4
5
6
7
8
9
10
11
12
13
14
15
16
17
18
19
20
21
22
23
24
25
26
27
28
29
30
31
32
33
34
public string GetData(string inputData)
{
//will hold the result
string result = string.Empty;
//build the request object
HttpWebRequest request = (HttpWebRequest)WebRequest.Create("https://someapi.com/");
//add certificate to the request
//request.ClientCertificates.Add(new X509Certificate(@"C:\certs\Some Cert.p12", @"SecretP@$$w0rd"));
//add it in a better way
X509Store certStore = new X509Store("My", StoreLocation.LocalMachine);
certStore.Open(OpenFlags.ReadOnly | OpenFlags.OpenExistingOnly);
X509Certificate2 cert = certStore.Certificates.Find(X509FindType.FindBySubjectName, "My cert subject", false)[0];
certStore.Close();
request.ClientCertificates.Add(cert);
//write the input data (aka post) to a byte array
byte[] requestBytes = new ASCIIEncoding().GetBytes(inputData);
//get the request stream to write the post to
Stream requestStream = request.GetRequestStream();
//write the post to the request stream
requestStream.Write(requestBytes, 0, requestBytes.Length);
//build a response object to hold the response
//submit the request by calling get response
HttpWebResponse response = (HttpWebResponse)request.GetResponse();
//get the response stream to read the response from
Stream responseStream = response.GetResponseStream();
//now read it out to our result
using (StreamReader rdr = new StreamReader(responseStream))
{
//set the result to the contents of the stream
result = rdr.ReadToEnd();
}
//return
return result;
}

Hope this helps!

View Comments
04/12/2009

Finding Text in SQL Server Stored Procedures

So, I’m sure you have been met with a similar scenario during development. You know the one that you have to rename a column or even drop a column in the database. This can be quite annoying if you are doing stored procedure based data access for your application. Once you change the column on the table, you have to figure out which stored procedures reference the column. They aren’t always tough to find most of the time, but sometimes you are dealing with a column that may be referenced in many stored procedures. Well thanks to my boss Cliff’s research and knowledge sharing, your search can be as easy as ours!

The query:

1
2
3
4
5
6
7
8
9
10
11
USE Northwind
GO
DECLARE @SearchText AS VARCHAR(50)
SET @SearchText = 'CustomerID'

SELECT
ROUTINE_NAME,
ROUTINE_DEFINITION
FROM INFORMATION_SCHEMA.ROUTINES
WHERE ROUTINE_NAME LIKE '%' + @SearchText + '%'
OR ROUTINE_DEFINITION LIKE '%' + @SearchText + '%'

This query will return all the names and routine definitions of stored procedures that contain certain text. It is not really bound by column names but I needed a true development scenario. Run the query with what you are looking for and presto! All the stored procedures you will need to modify.

Hope this helps!

View Comments
12/12/2008

SQL Server Side Paging With a Validated Dynamic Order By

So this is what it has come to anymore. Everyone is all about server side paging via SQL Server. As well they should be! It is so much faster and more efficient than having ADO or ADO.NET bring back a ton of records and then chop it to page it. However, there has always been some problems when trying to accomplish this task, especially using a SQL database that is pre 2005.

This task is easier to accomplish in SQL 2005 and 2008 using the ROW_NUMBER() function. The part that gets flaky is having a dynamic order by clause in your SQL statement. Unfortunately, the only way to accomplish this is to write some dynamic SQL. In doing so, It can be hard to tell if the order by parameter received by the stored procedure is a valid one for the table you are selecting from.

Solution

Enter the "IsValidOrderBy" user-defined function. This is a little function that will tell you if the column and order in the dynamic order by parameter is a valid one for the select statement you are running.

1
2
3
4
5
6
7
8
9
10
11
12
13
14
15
16
17
18
19
20
21
22
23
24
25
26
27
28
29
30
31
32
33
34
35
36
37
38
39
CREATE FUNCTION [dbo].[udf_OrderByExists] 
(
@TableName NVARCHAR(50),
@OrderBy NVARCHAR(50)
)
RETURNS BIT
AS
BEGIN

DECLARE @Result BIT
SET @Result = 0

DECLARE @TableColumns TABLE
(
[ColumnNameAndSort] NVARCHAR(100) NOT NULL
)

INSERT INTO @TableColumns
SELECT [Name]
FROM syscolumns
WHERE ID = OBJECT_ID(@TableName)

INSERT INTO @TableColumns
SELECT [Name] + ' ASC'
FROM syscolumns
WHERE ID = OBJECT_ID(@TableName)

INSERT INTO @TableColumns
SELECT [Name] + ' DESC'
FROM syscolumns
WHERE ID = OBJECT_ID(@TableName)

IF EXISTS(SELECT [ColumnNameAndSort] FROM
@TableColumns WHERE [ColumnNameAndSort] = @OrderBy)
SET @Result = 1

RETURN @Result

END

Here you can see that we are taking 2 inputs. The first one being the table name you are selecting from, and the second being the order by clause received by the stored procedure. The function will then return a bit telling you if the column and order was found for the table you are selecting from.

Example

A simple example of using this user defined function would be selecting from a table of products. In that case, your stored procedure could look like so

1
2
3
4
5
6
7
8
9
10
11
12
13
14
15
16
17
18
19
20
21
22
23
24
25
26
27
28
29
30
31
32
33
34
35
36
37
38
39
40
41
42
43
44
45
46
47
48
49
50
51
52
53
CREATE PROCEDURE [dbo].[usp_GetProductsPaged]
@SortExpression NVARCHAR(50),
@PageIndex INT,
@PageSize INT
AS

-- SET NOCOUNT ON added to prevent extra result sets from
-- interfering with SELECT statements.
SET NOCOUNT ON;

IF ((SELECT [dbo].[udf_OrderByExists]('dbo.Products', @SortExpression)) = 0)
SET @SortExpression = 'Name'

DECLARE @sql AS NVARCHAR(MAX),
@ParamDefinition AS NVARCHAR(MAX),
@StartRowIndex INT,
@RecordCount INT

SELECT @RecordCount = COUNT([ProductID]) FROM [Products]

IF @PageIndex = 0
SET @PageIndex = 1
IF @PageSize = 0
SET @PageSize = @RecordCount
SET @StartRowIndex = ((@PageIndex * @PageSize) - @PageSize) + 1
SET @ParamDefinition = N'@paramStartRowIndex INT,
@paramPageSize INT'

SET @sql = N'SELECT
[ProductID],
[Name],
[Description],
[Price]
FROM (SELECT
[ProductID],
[Name],
[Description],
[Price],
ROW_NUMBER() OVER(ORDER BY ' + @SortExpression + ') AS [RowNumber]
FROM [Products]) AS [Prods]
WHERE [RowNumber] BETWEEN @paramStartRowIndex
AND (@paramStartRowIndex + @paramPageSize) - 1'

-- For testing
--PRINT @sql
--PRINT @StartRowIndex

EXEC sp_executesql @sql,
@ParamDefinition,
@paramStartRowIndex = @StartRowIndex,
@paramPageSize = @PageSize

SELECT @RecordCount AS [RecordCount]

As you can see, by calling **udf_OrderByExists **and passing in the parameters, if the order by does not fit the table, we then change it to be something known and valid.

Conclusion

With a simple and portable user defined function, we can ensure that the order by clauses going into our paging stored procedures are validated thus keeping integrity. It isn’t fun having to write and maintain dynamic SQL in stored procedures, but it can be done and also made a little bit safer. One last tip: Always use the sp_executesql, as this will tell the SQL server that the execution plan should be cached for re-use.

Hope this helps!

View Comments
10/08/2008

The Private Access Modifier Can Do That?

If you look up accessibility levels on the MSDN web site, it will tell you that the accessibility of the private access modifier is limited to the containing type. I ran into an instance that showed me the direct meaning of this statement. The scenario I had was this: I wanted to have the ability to make an object read only. That is the original object however, if a clone was made then the object could be modified again because it wasn’t the original object. Of course this is a simple task, we get to go back and visit my good friend ICloneable.

So we start off by making our data object, putting in the ability to mark it read only and giving it the ability to clone itself.

1
2
3
4
5
6
7
8
9
10
11
12
13
14
15
16
17
18
19
20
21
22
23
24
25
26
27
28
29
30
31
32
33
34
35
36
37
38
39
40
41
42
43
44
45
46
47
48
49
50
51
52
53
public class Lion : ICloneable
{
public Lion()
{

}

public Lion(string name)
{
this.Name = name;
}

private bool _isReadOnly;

public bool IsReadOnly
{
get { return _isReadOnly; }
}

private string _name;

public string Name
{
get { return _name; }
set
{
if (_isReadOnly)
throw new ReadOnlyException("This object is read only");
_name = value;
}
}

public void MakeReadOnly()
{
_isReadOnly = true;
}

#region ICloneable Members

public Lion Clone()
{
Lion result = (Lion)((ICloneable)this).Clone();
result._isReadOnly = false;
return result;
}

object ICloneable.Clone()
{
return this.MemberwiseClone();
}

#endregion
}

Take a look at line #43 above. During the cloning process, you can set the private variable _isReadOnly on the newly cloned object!

For some reason, I was under the impression that any and all private fields and methods were private to that instance of the object. This would mean that all private members of the cloned object would have to be called in the cloned object. To my surprise, this is not the case at all. After changing the _isReadOnly field of the cloned object, the object that was cloned will still remain read only. The cloned object will remain editable until the MakeReadOnly() method is called on it.

Conclusion

All fields and methods with the private access modifier are exposed at any time as long as you are in the containing type. The implications of this are that if you clone an object you will have access to the private members of the newly created object. This can be extremely useful, especially if you want a specific action to be performed on a cloned object but you don’t want to explicitly call that action publicly.

Hope this helps!

View Comments
09/23/2008

ASP.NET Ajax, JQuery & JSON Date Serialization

A little while back I came across a great post on how to use JQuery to do more efficient client side paging by Dave Ward. The sample shows you how to use JQuery to do Ajax callbacks for client side paging using a grid template. After downloading the demo and parsing through it all, I found a lot of things I really liked and even came across a little gotchya with the way ASP.NET serializes dates in JSON.

One part I really enjoyed about this sample is that your objects on the server are translated into client side objects. So Order.OrderID or Order.ShippingAddress.ShipName would work the same on the client and server side of the programming. The jtemplates add-in allows you to name your active object of the collection you are looping through a lot like .NET like so:

1
2
3
4
5
6
7
8
9
10
11
12
13
14
15
16
17
18
19
20
21
<tbody>
{#foreach $T.d as order}
<tr>
<td>
{$T.order.OrderID}
</td>
<td>
{$T.order.ShippingAddress.ShipName}
</td>
<td>
{DateDeserialize($T.order.OrderDate).format('MM/dd/yyyy')}
</td>
<td>
{DateDeserialize($T.order.RequiredDate).format('MM/dd/yyyy')}
</td>
<td>
{$T.order.ShippingAddress.ShipCountry}
</td>
</tr>
{#/for}
</tbody>

As you can see the order object is used in the jtemplates code just like in .NET code.

You may have noticed the DateDeserialize() function followed by the extension method .format() in the snipped above. This is due to some date deserialization issues I ran into. The signature for the DateDeserialize method is as so:

1
2
3
function DateDeserialize(dateStr) {
return eval('new' + dateStr.replace(/\//g, ' '));
}

This method is basically returning the evaluation of the date returned by the .NET framework (ex: /Date(894427200000)/), replacing the / with a space with the keyword "new" in front of it. This will return us a JavaScript Date object. Then I'm using the .format() extension method from the included MSAjax framework. It took me a little while to figure out, but once I did I fell in love. You can't put a price on full on object-oriented programming!

Special thanks to Dave Ward for opening my eyes to the power of JQuery!

Hope this helps!

View Comments
08/26/2008

LINQ Distinct, a DataTable and the IEqualityComparer

In a recent situation I was trying to pull some aggregates out of a DataTable using LINQ. I needed to get the rows of the DataTable with a Distinct clause, but my aggregates would be on other columns of the row. The problem is that when you call LINQ’s Distinct() extension method with no arguments, it uses the "default IEqualityComparer". This means that it will work if you use the Select() extension method, only returning the column you want the distinct on. Well that works great, unless you need more columns from the DataTable.

The solution here is simple. Write a custom DataRow comparer that compares the DataRow against the column you are trying to put the distinct on. Here is an example:

1
2
3
4
5
6
7
8
9
10
11
12
13
14
15
16
public class PersonDataRowComparer : IEqualityComparer<DataRow>
{
#region IEqualityComparer<DataRow> Members

public bool Equals(DataRow x, DataRow y)
{
return (x.Field<int>("PersonID") == y.Field<int>("PersonID"));
}

public int GetHashCode(DataRow obj)
{
return obj.ToString().GetHashCode();
}

#endregion
}

Once we inherit IEqualityComparer<T> (T being the type we want to do the comparison on) all we do is fill in the Equals() and the GetHashCode() methods. In the Equals() method, we just tell the DataRows to compare the fields "PersonID" and return if they are equal. This will tell LINQ if the DataRow is distinct or not.

Hope this helps!

View Comments
06/03/2008

Strongly Typed Dynamic User Controls

A short time ago I was confronted with a serious problem. What I needed to do was dynamically choose a UserControl as well as fire methods from that UserControl. The problem lies in the fact that a UserControl does not implement my custom methods that I needed for my controls. Each control was similar and would have the same methods but it would have different display characteristics.

That was when I had a small epiphany. Why can’t I just make an abstract base class? Well the answer is you can! Sometimes I am prone to forget how .NET allows me to customize pre-defined classes. What we can do is create an abstract base class that inherits the UserControl class, then have our UserControls inherit from our base class.

First we will create our abstract base class.

1
2
3
4
5
6
7
8
9
10
11
12
13
14
15
16
17
18
19
20
21
22
using System;
using System.Data;
using System.Configuration;
using System.Linq;
using System.Web;
using System.Web.Security;
using System.Web.UI;
using System.Web.UI.HtmlControls;
using System.Web.UI.WebControls;
using System.Web.UI.WebControls.WebParts;
using System.Xml.Linq;

/// <summary>
/// Base class to be inherited by a UserControl that displays the date
/// </summary>
public abstract class DateTimeDisplayControl : UserControl
{
/// <summary>
/// Updates the date time inside the user control.
/// </summary>
public abstract void UpdateDateTime();
}

So in the snippet above, we have created a class called DateTimeDisplayControl. This inherits from UserControl and will have to override the abstract method UpdateDateTime().

Now we can create a couple of UserControls that inherit from our DisplayDateTimeControl class. The first control will be called "ControlOne".

Here is the *.ascx code:

1
2
3
4
5
6
7
<%@ Control Language="C#" AutoEventWireup="true" CodeFile="ControlOne.ascx.cs" Inherits="UserControls_ControlOne" %>
<p>User control one</p>
<asp:UpdatePanel ID="udp1" runat="server" UpdateMode="Conditional">
<ContentTemplate>
<asp:Label ID="lblDateTime" runat="server" />
</ContentTemplate>
</asp:UpdatePanel>

Here is the code behind:

1
2
3
4
5
6
7
8
9
10
11
12
13
14
15
16
17
18
19
20
21
22
23
24
25
26
27
using System;
using System.Collections;
using System.Configuration;
using System.Data;
using System.Linq;
using System.Web;
using System.Web.Security;
using System.Web.UI;
using System.Web.UI.HtmlControls;
using System.Web.UI.WebControls;
using System.Web.UI.WebControls.WebParts;
using System.Xml.Linq;

public partial class UserControls_ControlOne : DateTimeDisplayControl
{
protected void Page_Load(object sender, EventArgs e)
{
if (!Page.IsPostBack)
UpdateDateTime();
}

public override void UpdateDateTime()
{
lblDateTime.Text = DateTime.Now.ToString();
udp1.Update();
}
}

As you can see, ControlOne contains an UpdatePanel with a Label inside of it. The Label will display the date and time. We will call our second control "ControlTwo" and it will look exactly like ControlOne, only it will say "User control two" inside of it.

Now we will create the actual *.aspx page to display the controls.

Here is the *.aspx code

1
2
3
4
5
6
7
8
9
10
11
12
13
14
15
16
17
18
19
20
21
22
23
24
25
26
27
28
29
30
31
32
<%@ Page Language="C#" AutoEventWireup="true"  CodeFile="Default.aspx.cs" Inherits="_Default" %>

<!DOCTYPE html PUBLIC "-//W3C//DTD XHTML 1.0 Transitional//EN" "http://www.w3.org/TR/xhtml1/DTD/xhtml1-transitional.dtd">

<html xmlns="http://www.w3.org/1999/xhtml&quot;>
<head runat="server">
<title>Strongly Typed Dynamic User Controls</title>
</head>
<body>
<form id="form1" runat="server">
<asp:ScriptManager ID="sm1" runat="server" />
<asp:UpdatePanel ID="udp" runat="server" UpdateMode="Conditional">
<ContentTemplate>
<asp:Panel ID="pnlContent" runat="server" />
</ContentTemplate>
<Triggers>
<asp:AsyncPostBackTrigger ControlID="btnUseControlOne" EventName="Click" />
<asp:AsyncPostBackTrigger ControlID="btnUseControlTwo" EventName="Click" />
<asp:AsyncPostBackTrigger ControlID="btnUpdateDateTime" EventName="Click" />
</Triggers>
</asp:UpdatePanel>
<p>
<asp:Button ID="btnUseControlOne" runat="server" Text="Use Control One"
onclick="btnUseControlOne_Click" />&nbsp;
<asp:Button ID="btnUseControlTwo" runat="server" Text="Use Control Two"
onclick="btnUseControlTwo_Click" />&nbsp;
<asp:Button ID="btnUpdateDateTime" runat="server" Text="Update Content"
onclick="btnUpdateDateTime_Click" />
</p>
</form>
</body>
</html>

Here is the code behind:

1
2
3
4
5
6
7
8
9
10
11
12
13
14
15
16
17
18
19
20
21
22
23
24
25
26
27
28
29
30
31
32
33
34
35
36
37
38
39
40
41
42
43
44
45
46
47
48
49
50
51
52
53
54
55
56
57
58
59
60
61
62
63
64
65
66
67
68
69
70
71
72
73
74
75
using System;
using System.Configuration;
using System.Data;
using System.Linq;
using System.Web;
using System.Web.Security;
using System.Web.UI;
using System.Web.UI.HtmlControls;
using System.Web.UI.WebControls;
using System.Web.UI.WebControls.WebParts;
using System.Xml.Linq;

public partial class _Default : System.Web.UI.Page
{
private string _controlVirtualPath = string.Empty;
private DateTimeDisplayControl _DateTimeDisplayControl = null;

private string ControlVirtualPath
{
get
{
if (string.IsNullOrEmpty(_controlVirtualPath))
_controlVirtualPath = ViewState["ControlVirtualPath"].ToString();
ViewState["ControlVirtualPath"] = _controlVirtualPath;
if (string.IsNullOrEmpty(_controlVirtualPath))
throw new ApplicationException("The control virtual path was not found");
return _controlVirtualPath;
}
}

private DateTimeDisplayControl LoadedAjaxControl
{
get
{
if (_DateTimeDisplayControl == null)
{
_DateTimeDisplayControl = (DateTimeDisplayControl)Page.LoadControl(ControlVirtualPath);
}
return _DateTimeDisplayControl;
}
}

private void LoadAndDisplayUserControl()
{
pnlContent.Controls.Add(LoadedAjaxControl);
}

private void LoadAndDisplayUserControl(string controlVirtualPath)
{
_controlVirtualPath = controlVirtualPath;
pnlContent.Controls.Add(LoadedAjaxControl);
}

protected void Page_Load(object sender, EventArgs e)
{
if (!Page.IsPostBack)
LoadAndDisplayUserControl("~/UserControls/ControlOne.ascx");
}

protected void btnUseControlOne_Click(object sender, EventArgs e)
{
LoadAndDisplayUserControl("~/UserControls/ControlOne.ascx");
}

protected void btnUseControlTwo_Click(object sender, EventArgs e)
{
LoadAndDisplayUserControl("~/UserControls/ControlTwo.ascx");
}

protected void btnUpdateDateTime_Click(object sender, EventArgs e)
{
LoadAndDisplayUserControl();
LoadedAjaxControl.UpdateDateTime();
}
}

As you may see, the *.aspx page will load up ControlOne by default. There are 3 buttons on the page that will allow you to swap out ControlOne and ControlTwo as well as call the UpdateDateTime() method of the controls.

That is all there is to it! One important note is that I am using a private property to get the loaded control, this is important to note because you will need to call that UpdateDateTime() method on the instance of the control that you rendered to the page. I don’t know why I didn’t think of this long ago, but I hope you will find it as useful as I did!

Happy coding!

View Comments
04/21/2008

Using the Event Model: Throwing and Handling Custom Events

If you haven’t tried using the event model in .NET you don’t know what you’re missing. If this is the case, then I’m glad you’re here. Events are a very nice way to add flexibility to your projects and eliminate cross cutting concerns. You can use them for a variety of things including validation and logging. You can think of an event as sort of an All Points Bulletin (APB) throughout your application. Once you declare and throw an event, every place in your code that has an event handler for that event will be executed. Events can be both static or per instance. You use events every time you build an ASP.NET website. The Page_Load event, Button_Click event, etc… It is like an application wide notification that something is happening.

An important note is that all event handlers that have been moved to the call stack will be fired. So when you call out to your custom event, all objects that are in the call stack with an event handler for that event will be fired. Another thing to keep in mind is that there is no guaranteed order in which the events will be fired. If you are in need of doing something that requires a specific order, you should use more events or take another approach entirely.

In this project, we will create some events and handle them in a logging system. The first thing we will need to do is set up an event delegate to strongly type our event. Along with doing that, I like to setup some custom event arguments that will take in the object(s) that I will be dealing with during the event.

1
2
3
4
5
6
7
8
9
10
11
12
13
14
15
16
17
18
19
20
21
22
23
24
25
26
27
28
29
30
31
using System; using System.Collections.Generic; 

//Delegate for a PersonEvent
public delegate void PersonEvent(PersonEventArgs e);

public class PersonEventArgs : EventArgs
{
public PersonEventArgs()
{

}

public PersonEventArgs(Person person)
{
this.Person = person;
}

public PersonEventArgs(List<Person> personList)
{
this.PersonList = personList;
}

//Person the action will be on
public Person Person { get; private set; }

//List of person the action will be on
public List<Person> PersonList { get; private set; }

//For canceling action
public bool Cancel { get; set; }
}

Ok, Now all we have to do is declare and throw our events. When declaring our events, they will be of the type PersonEvent.

1
2
3
4
5
6
7
8
9
10
11
12
13
14
15
16
17
18
19
20
21
22
23
24
25
26
27
28
29
30
31
32
33
34
35
36
37
38
39
40
41
42
43
44
45
46
47
48
49
50
51
52
53
54
55
56
57
58
59
60
61
62
63
64
65
66
67
68
69
70
71
72
73
74
75
76
77
78
79
80
81
82
83
84
85
86
87
88
89
90
91
92
93
94
95
96
97
98
99
100
101
102
103
104
105
106
107
108
using System.Collections.Generic; 
using System.ComponentModel;

[DataObject(true)]
public class PersonBLL
{
//Declare events
public static event PersonEvent Pre_Get;
public static event PersonEvent Post_Get;
public static event PersonEvent Pre_Insert;
public static event PersonEvent Post_Insert;
public static event PersonEvent Pre_Update;
public static event PersonEvent Post_Update;
public static event PersonEvent Pre_Delete;
public static event PersonEvent Post_Delete;

[DataObjectMethod(DataObjectMethodType.Select)]
public List<PersonPresentationShell> GetPeople()
{
//Call out to event handler
if (Pre_Get != null)
{
PersonEventArgs args = new PersonEventArgs();
Pre_Get(args);
if (args.Cancel) return null;
}

List<PersonPresentationShell> result = new List<PersonPresentationShell>();
List<Person> personList = DataAccessFactory.GetPeople();
foreach (Person item in personList)
{
result.Add(new PersonPresentationShell(item));
}

//Call out to event handler
if (Post_Get != null)
{
PersonEventArgs args = new PersonEventArgs(personList);
Post_Get(args);
if (args.Cancel) return null;
}

return result;
}

[DataObjectMethod(DataObjectMethodType.Update)]
public void UpdatePerson(PersonPresentationShell p)
{
//Call out to event handler
if (Pre_Update != null)
{
PersonEventArgs args = new PersonEventArgs(p.Person);
Pre_Update(args);
if (args.Cancel) return;
}

DataAccessFactory.UpdatePerson(p.Person);

//Call out to event handler
if (Post_Update != null)
{
PersonEventArgs args = new PersonEventArgs(p.Person);
Post_Update(args);
}
}

[DataObjectMethod(DataObjectMethodType.Delete)]
public void DeletePerson(PersonPresentationShell p)
{
//Call out to event handler
if (Pre_Delete != null)
{
PersonEventArgs args = new PersonEventArgs(p.Person);
Pre_Delete(args);
if (args.Cancel) return;
}

DataAccessFactory.DeletePerson(p.Person);

//Call out to event handler
if (Post_Delete != null)
{
PersonEventArgs args = new PersonEventArgs(p.Person);
Post_Delete(args);
}
}

[DataObjectMethod(DataObjectMethodType.Insert)]
public void InsertPerson(PersonPresentationShell p)
{
//Call out to event handler
if (Pre_Insert != null)
{
PersonEventArgs args = new PersonEventArgs(p.Person);
Pre_Insert(args);
if (args.Cancel) return;
}

DataAccessFactory.InsertPerson(p.Person);

//Call out to event handler
if (Post_Insert != null)
{
PersonEventArgs args = new PersonEventArgs(p.Person);
Post_Insert(args);
}
}
}

There we have it! An event will now be thrown before and after every get, insert, update and delete. Now we have to set up some event handlers in our logging object.

1
2
3
4
5
6
7
8
9
10
11
12
13
14
15
16
17
18
19
20
21
22
23
24
25
26
27
28
29
30
31
32
33
34
35
36
37
38
39
40
41
42
43
44
45
46
47
48
49
50
51
52
53
54
55
56
57
58
59
60
61
62
63
64
65
66
67
68
69
70
71
72
73
74
75
76
77
using System; 
using System.IO;
using System.Web;

public class Logger
{
//Set the log file location
private static string _logFileLocation = HttpContext.Current.Server.MapPath("~/App_Data/logfile.log");

static Logger()
{
//Attach event handlers
PersonBLL.Pre_Delete += new PersonEvent(PersonBLL_Pre_Delete);
PersonBLL.Post_Delete += new PersonEvent(PersonBLL_Post_Delete);
PersonBLL.Pre_Get += new PersonEvent(PersonBLL_Pre_Get);
PersonBLL.Post_Get += new PersonEvent(PersonBLL_Post_Get);
PersonBLL.Pre_Insert += new PersonEvent(PersonBLL_Pre_Insert);
PersonBLL.Post_Insert += new PersonEvent(PersonBLL_Post_Insert);
PersonBLL.Pre_Update += new PersonEvent(PersonBLL_Pre_Update);
PersonBLL.Post_Update += new PersonEvent(PersonBLL_Post_Update);
}

static void PersonBLL_Post_Update(PersonEventArgs e)
{
WriteToLogFile("PersonId: " + e.Person.PersonId.ToString() + " - " + e.Person.FirstName + " " + e.Person.LastName
+ " was updated”);
}

static void PersonBLL_Pre_Update(PersonEventArgs e)
{
WriteToLogFile("PersonId: " + e.Person.PersonId.ToString() + " - " + e.Person.FirstName + " " + e.Person.LastName
+ " is about to be updated”);
}

static void PersonBLL_Post_Insert(PersonEventArgs e)
{
WriteToLogFile("PersonId: " + e.Person.PersonId.ToString() + " - " + e.Person.FirstName + " " + e.Person.LastName
+ " was inserted”);
}

static void PersonBLL_Pre_Insert(PersonEventArgs e)
{
WriteToLogFile("PersonId: " + e.Person.PersonId.ToString() + " - " + e.Person.FirstName + " " + e.Person.LastName
+ " is about to be inserted”);
}

static void PersonBLL_Post_Get(PersonEventArgs e)
{
WriteToLogFile("The people were gotten”);
}

static void PersonBLL_Pre_Get(PersonEventArgs e)
{
WriteToLogFile("The people are about to be gotten”);
}

static void PersonBLL_Post_Delete(PersonEventArgs e)
{
WriteToLogFile("PersonId: " + e.Person.PersonId.ToString() + " - " + e.Person.FirstName + " " + e.Person.LastName
+ " was deleted”);
}

static void PersonBLL_Pre_Delete(PersonEventArgs e)
{
WriteToLogFile("PersonId: " + e.Person.PersonId.ToString() + " - " + e.Person.FirstName + " " + e.Person.LastName
+ " is about to be deleted”);
}

public static void WriteToLogFile(string message)
{
DateTime now = DateTime.Now;
using(StreamWriter sw = File.AppendText(_logFileLocation))
{
sw.WriteLine(now.ToString() + " - " + message);
}
}
}

Finally, we have to create an instance of our logger class in the Global.asax file to attach our event handlers to our events when the application starts.

1
2
3
4
5
6
void Application_Start(object sender, EventArgs e)  
{
//Create an instance of the logger
//To attach event handlers
Logger logger = new Logger();
}

There we have it. Now on every CRUD operation in our application, a log entry will be written with some data about that action. Once you get the hang of it events become extremely useful. One big instance I like to use it for is authorization of performing an action in a membership and roles scenario.

Hope this helps!

View Comments
04/14/2008

Clean Up ASP.NETs Head Tag With ControlAdapters

Ok, if you’re anything like me you absolutely gag when you see the rendered content of the ASP.NET head tag. It is all rendered out inline for some reason. I’m not 100% sure about the affects of it on web marketing, but I know one thing is for sure… It certainly doesn’t help your rankings any. At the very least it looks gross and it can be easily fixed with some portable c# files that you can include in any project. I found a reference here about it, so I picked it up and ran with it.

A couple of good things to note is the placement of some key pieces for control adapters in the .NET framework. The ControlAdapter class should be inherited for every control adapter you create, it can be found in the System.Web.UI.Adapters namespace. All of the tags we will be overriding belong to the System.Web.UI.HtmlControls namespace.

The first tag we will override is the head tag itself.

1
2
3
4
5
6
7
8
9
10
11
12
13
14
15
16
17
18
19
20
using System.Web.UI; 
using System.Web.UI.Adapters;
using System.Web.UI.HtmlControls;
namespace Rollem.ControlAdapters
{
public class HtmlHeadAdapter : ControlAdapter
{
protected override void Render(HtmlTextWriter writer)
{
HtmlHead headTag = (HtmlHead)this.Control;
writer.WriteBeginTag("head");
if (!string.IsNullOrEmpty(headTag.ID))
writer.WriteAttribute("id", headTag.ClientID);
writer.Write(HtmlTextWriter.TagRightChar);
foreach (Control item in headTag.Controls)
item.RenderControl(writer);
writer.WriteLine("");
}
}
}

Next we are on to the title tag.

1
2
3
4
5
6
7
8
9
10
11
12
13
14
15
16
using System.Web.UI; 
using System.Web.UI.Adapters;
namespace Rollem.ControlAdapters
{
public class HtmlTitleAdapter : ControlAdapter
{
protected override void Render(HtmlTextWriter writer)
{
writer.WriteLine();
writer.WriteFullBeginTag("title");
writer.Write(Page.Title);
writer.WriteEndTag("title");
writer.WriteLine();
}
}
}

Now the link tags.

1
2
3
4
5
6
7
8
9
10
11
12
13
14
15
16
17
18
19
20
21
22
23
24
25
26
using System.Collections; 
using System.Web.UI;
using System.Web.UI.Adapters;
using System.Web.UI.HtmlControls;
namespace Rollem.ControlAdapters
{
public class HtmlLinkAdapter : ControlAdapter
{
protected override void Render(HtmlTextWriter writer)
{
HtmlLink linkTag = (HtmlLink)this.Control;
writer.Write("<link");
AttributeCollection attributes = linkTag.Attributes;
IEnumerator keys = linkTag.Attributes.Keys.GetEnumerator();
while (keys.MoveNext())
{
string key = (string)keys.Current;
if (key.ToLower() == "href" && attributes[key].Contains("~"))
writer.WriteAttribute(key, linkTag.ResolveClientUrl(attributes[key]));
else
writer.WriteAttribute(key, attributes[key]);
writer.WriteLine(" />");
}
}
}
}

Last but not least, the meta tags.

1
2
3
4
5
6
7
8
9
10
11
12
13
14
15
16
17
18
19
20
using System.Web.UI; 
using System.Web.UI.Adapters;
using System.Web.UI.HtmlControls;
namespace Rollem.ControlAdapters
{
public class HtmlMetaAdapter : ControlAdapter
{
protected override void Render(HtmlTextWriter writer)
{
HtmlMeta metaTag = (HtmlMeta)this.Control;
writer.WriteBeginTag("meta");
if (!string.IsNullOrEmpty(metaTag.HttpEquiv))
writer.WriteAttribute("http-equiv", metaTag.HttpEquiv);
if (!string.IsNullOrEmpty(metaTag.Name))
writer.WriteAttribute("name", metaTag.Name);
writer.WriteAttribute("content", metaTag.Content);
writer.WriteLine(HtmlTextWriter.SelfClosingTagEnd);
}
}
}

Now all we have to do is setup a *.browser file in the App_Browsers folder to map the control adapter overrides.

1
2
3
4
5
6
7
8
9
10
11
12
13
14
<browsers>     
<browser refID="Default">
<controlAdapters>
<adapter controlType="System.Web.UI.HtmlControls.HtmlHead"
adapterType="Rollem.ControlAdapters.HtmlHeadAdapter" />
<adapter controlType="System.Web.UI.HtmlControls.HtmlTitle"
adapterType="Rollem.ControlAdapters.HtmlTitleAdapter" />
<adapter controlType="System.Web.UI.HtmlControls.HtmlMeta"
adapterType="Rollem.ControlAdapters.HtmlMetaAdapter" />
<adapter controlType="System.Web.UI.HtmlControls.HtmlLink"
adapterType="Rollem.ControlAdapters.HtmlLinkAdapter" />
</controlAdapters>
</browser>
</browsers>

Now if we right click and view source we will see a nice clean head tag.

Don’t live a moment longer with that ugly ASP.NET rendered head tag! 

Hope this helps!

View Comments